Managed metadata is a hierarchical collection of centrally managed terms that you can define, and then use as attributes for items in Microsoft SharePoint Server 2010.
The managed metadata service application serves two purposes:
- It enables the use of managed metadata;
- It allows you to share content types across site collections and Web applications.
This article introduces how to create managed metadata service application and how to use Metadata in list.
How to create managed metadata service application
Ensure you have the required permissions to perform this procedure. To create a managed metadata service application, you must be both a member of the Administrators group on the computer running the SharePoint Central Administration Web site, and a member of the Farm Administrators group.
1. Select “Manage service application” under “Application Management” on the home page of the SharePoint Central Administration Website;

2. Create a new Managed Metadata Service by clicking “New – Managed Metadata Service” on the ribbon;

3. On the Create New Managed Metadata Service page, type a name for the service; In the Database Server box, type the name of the database server that hosts the term store. Generally, if you are using SQL Express, please do not change the default value “<Computer Name>\SharePoint”;

4. Input a Database Name in the Database Name box, cf snapshot above;
Note: Please input a new database name if want to create a new database; otherwise please give an existing database name that you want to connect to;
5. Select “Windows authentication” to use Windows authentication to access the database, or select “SQL authentication” to use SQL authentication. If SQL authentication is selected, please input the account name in Account box and the password in the password box;
6. If using SQL Failover, please give the failover database server name; Otherwise you can neglect this;
7. Choose the application pool to use for this service application. This defines the account and credentials that will be used by this web service. You can choose an existing application pool or create a new one.

8. Enter the URL of the site collection (Content Type hub) from which this service application will consume content types if you want the metadata service provide content type library and terminology visits. Of course, you can input nothing 🙂
9. Click “OK” to complete the creation of metadata service.
10. Lastly, navigate to Central Administration -> System Settings -> Manage Services on server and start the managed metadata web service.
Now that we have successfully setup the managed metadata service, let’s venture into the Term Store Management Tool.
11. Click “Manage service application” under “Service Applications” in the “Application Management” on the home page of Central Administration page. This will launch the screen below which is referred to as the Team Store Management Tool.

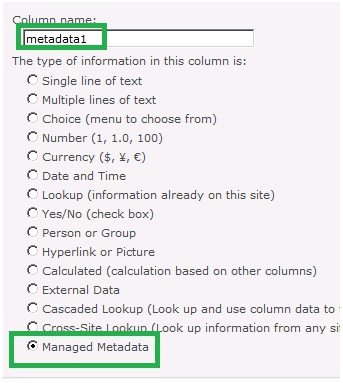
12. Log on to a site collection and you will see the Managed Metadata type when you create a column in a list;
The end.