Are you wasting your time to create a SharePoint foundation solution architecture?
Let’s assume you are a software architect, and you have to create the template for a new product. It is a repetitive task and will cost you a lot of time for the following:
You shall define the layers for your solution, such as Presentation Layer, Domain Layer, Data Access Layer, Service Layer, Infrastructure Layer and so on. In other words, you should create different projects in VisualStudio and build the projects relationships.
You should keep the same technology, otherwise when an employee is transferred from one product team to another, he will have to study a new technology (eg: one product team using Spring.NET IOC container and the other product team using Castle IOC container. What a bad message! The employee should master two different IOC framework).
Regarding to coding, you should reference the infrastructure assembly (Eg: IOC, AOP, Unit Test framework and so on), attach the xsd schema for xml configuration file input intellisense, and keep the same technology and code structure for all products.
What happens today?
You can create your SharePoint VisualStudio multiple project (the whole solution) template now.
Using it, when you want to start a new product, you can create your foundation code structure with the template. The whole creation process only takes a few seconds, finally you can put away the repetitive work and do something productive.
Preview of the Solution Template solution
The “Solution Template” solution is as follows:
There are three projects in the solution.
- Landpy.SolutionTemplate.TemplateContent is the content of the solution template (it includes the code, xsd, reference assembly, project configuration, SNK files and so on)
- Landpy.SolutionTemplate.VSIX is a Extensibility VSIX project, it will generate vsix file which can be installed as a VisualStudio extensibility. You install the extensiblity, then you can create your own solution as the build-in template.
- Landpy.SolutionTemplate.Wizard is the project to dynamically generate some code such as assembly info or namespace. It is always a WinForm project like a wizard when you create the solution with the template.
How to use the Solution Template
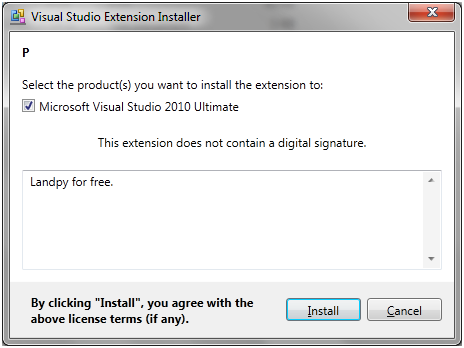
Step one: Double click the Landpy.SolutionTemplate.VSIX.vsix file to install the extensibility.
Step Two: Click the Install button.
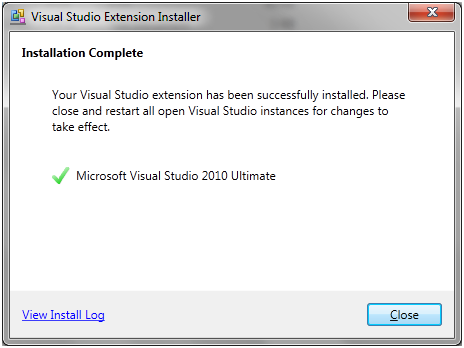
Step Three: The extensibility has been installed, click Close button.
Note: You should restart your VisualStudio to load the extensibility.
Step Four: Open Visual Studio, then click the menu File->New->Project, Select the template which will be installed in the last step.
Step Five: With the wizard create the new solution. Only takes you a few seconds.
Solution Structure
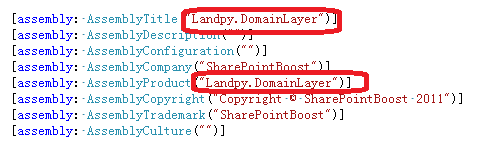
Assembly info is based on the wizard input.
CS file is based on the wizard input.
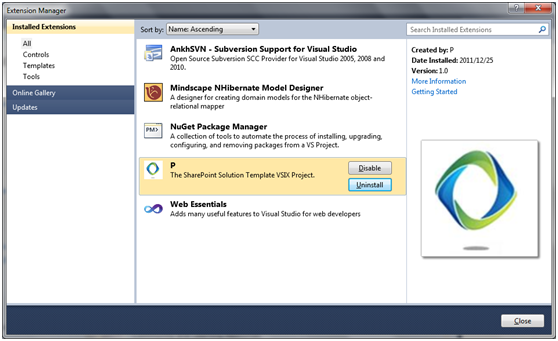
Note: If you want to uninstall the extensibility, you should open VisualStudio and click the menu Tools->Extension Manager…
Click the Uninstall button to uninstall the extensibility.
How to develop the Solution Template?
Step One: Create a content project:
For multiple project template, you should modify the vstemplate file as follows:
<?xmlversion=”1.0″encoding=”utf-8″?>
<VSTemplateVersion=”2.0.0″Type=”ProjectGroup”
xmlns=”http://schemas.microsoft.com/developer/vstemplate/2005″>
<TemplateData>
<Name>Landpy SharePoint Solution Template</Name>
<Description>Landpy SharePoint Solution Template</Description>
<Icon>Landpy.SolutionTemplate.TemplateContent.ico</Icon>
<ProjectType>CSharp</ProjectType>
<ProjectSubType>Eisk</ProjectSubType>
</TemplateData>
<TemplateContent>
<ProjectCollection>
<SolutionFolderName=”ProductProjects”>
<ProjectTemplateLinkProjectName=”SystemInterface”>
ProjectCollection\SystemInterfaceLayer\ProjectTemplate.vstemplate
</ProjectTemplateLink>
<ProjectTemplateLinkProjectName=”Core”>
ProjectCollection\Core\ProjectTemplate.vstemplate
</ProjectTemplateLink>
<ProjectTemplateLinkProjectName=”DomainLayer”>
ProjectCollection\DomainLayer\ProjectTemplate.vstemplate
</ProjectTemplateLink>
<ProjectTemplateLinkProjectName=”TestFramework”>
ProjectCollection\TestFramework\ProjectTemplate.vstemplate
</ProjectTemplateLink>
<ProjectTemplateLinkProjectName=”UnitTest”>
ProjectCollection\UnitTest\ProjectTemplate.vstemplate
</ProjectTemplateLink>
</SolutionFolder>
</ProjectCollection>
</TemplateContent>
</VSTemplate>
There are several ProjectTemplateLink to link the projects vstemplate file.
The Core, DomainLayer, PresentationLayer, SystemInterfaceLayer, TestFramework, UnitTest projects are not written by hand. There is a function that can export a single project as a template then you can copy the single template into the Solution Template. The steps are the following:
In the zip package, you can get the template content.
Note: the cs file Build Action should be “None”.
You can get the vstemplate file element info from http://msdn.microsoft.com/en-us/library/xwkxbww4.aspx
Step Two: Create wizard project
It is a Class Library type project, you should reference the System.Windows.Forms, Add a form.
namespace Landpy.SolutionTemplate.Wizard
{
publicpartialclassWizardForm : Form
    {
publicstring ProjectName { get; privateset; }
publicstring ProjectNamespace { get; privateset; }
publicstring BoxName
        {
set { this.LayerBox.Text = String.Format(@"{0} Layer", value); }
        }

public WizardForm()
        {
            InitializeComponent();
        }

privatevoid OK_Click(object sender, EventArgs e)
        {
this.ProjectName = this.ProjectNameValue.Text.Trim();
this.ProjectNamespace = this.ProjectNamespaceValue.Text.Trim();
this.Close();
this.Dispose();
        }
    }
}
And add the Wizard Class which is inherited from IWizard(Microsoft.VisualStudio.TemplateWizardInterface)
namespace Landpy.SolutionTemplate.Wizard.SolutionTemplateWizard
{
classUnitTestWizard : IWizard
    {
publicvoid BeforeOpeningFile(ProjectItem projectItem)
        {
        }

publicvoid ProjectFinishedGenerating(Project project)
        {
        }

publicvoid ProjectItemFinishedGenerating(ProjectItem projectItem)
        {
        }

publicvoid RunFinished()
        {
        }

publicvoid RunStarted(object automationObject, Dictionary replacementsDictionary, WizardRunKind runKind, object[] customParams)
        {
try
            {
                replacementsDictionary.Add("$DomainLayerProjectName$",
CommonReplacementsDictionary.ReplacementsDictionary["$DomainLayerProjectName$"]);
                replacementsDictionary.Add("$DomainLayerProjectNamespace$",
CommonReplacementsDictionary.ReplacementsDictionary["$DomainLayerProjectNamespace$"]);
                replacementsDictionary.Add("$SystemInterfaceProjectName$",
CommonReplacementsDictionary.ReplacementsDictionary["$SystemInterfaceProjectName$"]);
                replacementsDictionary.Add("$SystemInterfaceProjectNamespace$",
CommonReplacementsDictionary.ReplacementsDictionary["$SystemInterfaceProjectNamespace$"]);
            }
catch (Exception exception)
            {
MessageBox.Show(exception.Message);
            }
        }

publicbool ShouldAddProjectItem(string filePath)
        {
returntrue;
        }
    }
}
You should configure the vstemplate file as follows:
<TemplateData>
<Name>BoostSolutions.DomainLayer</Name>
<Description><;No description available>;</Description>
<ProjectType>CSharp</ProjectType>
<ProjectSubType>
</ProjectSubType>
<SortOrder>1000</SortOrder>
<CreateNewFolder>true</CreateNewFolder>
<DefaultName>BoostSolutions.DomainLayer</DefaultName>
<ProvideDefaultName>true</ProvideDefaultName>
<LocationField>Enabled</LocationField>
<EnableLocationBrowseButton>true</EnableLocationBrowseButton>
<Icon></Icon>
</TemplateData>
<TemplateContent>
<ProjectTargetFileName=”BoostSolutions.DomainLayer.csproj”File=”BoostSolutions.DomainLayer.csproj”ReplaceParameters=”true”>
<FolderName=”DemoModule”TargetFolderName=”DemoModule”>
<ProjectItemReplaceParameters=”true”TargetFileName=”Demo.cs”>Demo.cs</ProjectItem>
</Folder>
<FolderName=”Properties”TargetFolderName=”Properties”>
<ProjectItemReplaceParameters=”true”TargetFileName=”AssemblyInfo.cs”>AssemblyInfo.cs</ProjectItem>
</Folder>
<ProjectItemReplaceParameters=”false”TargetFileName=”BoostSolutions.snk”>BoostSolutions.snk</ProjectItem>
</Project>
</TemplateContent>
<WizardExtension>
<Assembly>Landpy.SolutionTemplate.Wizard, Version=1.0.0.0, Culture=neutral, PublicKeyToken=2a7779dfd1034e2f</Assembly>
<FullClassName>Landpy.SolutionTemplate.Wizard.SolutionTemplateWizard.DomainLayerWizard</FullClassName>
</WizardExtension>
</VSTemplate>
WizardExtension element will reference the wizard assembly.
namespace Landpy.SolutionTemplate.Wizard.SolutionTemplateWizard
{
classDomainLayerWizard : IWizard
    {
privateWizardForm wizardForm;

publicvoid BeforeOpeningFile(ProjectItem projectItem)
        {
        }

publicvoid ProjectFinishedGenerating(Project project)
        {
        }

publicvoid ProjectItemFinishedGenerating(ProjectItem projectItem)
        {
        }

publicvoid RunFinished()
        {
        }

publicvoid RunStarted(object automationObject, Dictionary replacementsDictionary, WizardRunKind runKind, object[] customParams)
        {
try
            {
this.wizardForm = newWizardForm();
this.wizardForm.BoxName = "Domain";
this.wizardForm.ShowDialog();
                replacementsDictionary.Add("$DomainLayerProjectName$",
this.wizardForm.ProjectName);
                replacementsDictionary.Add("$DomainLayerProjectNamespace$",
this.wizardForm.ProjectNamespace);
CommonReplacementsDictionary.ReplacementsDictionary.Add("$DomainLayerProjectName$",
this.wizardForm.ProjectName);
CommonReplacementsDictionary.ReplacementsDictionary.Add("$DomainLayerProjectNamespace$",
this.wizardForm.ProjectNamespace);
                replacementsDictionary.Add("$SystemInterfaceProjectName$",
CommonReplacementsDictionary.ReplacementsDictionary["$SystemInterfaceProjectName$"]);
                replacementsDictionary.Add("$SystemInterfaceProjectNamespace$",
CommonReplacementsDictionary.ReplacementsDictionary["$SystemInterfaceProjectNamespace$"]);
            }
catch (Exception exception)
            {
MessageBox.Show(exception.Message);
            }
        }

publicbool ShouldAddProjectItem(string filePath)
        {
returntrue;
        }
    }
}
The “$DomainLayerProjectName$” can be input in wizard form, and will be replaced in the generated file:
namespace $DomainLayerProjectName$.DemoModule
{
publicclassDemo : IDemo
    {
        [NotThrowException]
        [LogException]
publicint TestMethod()
        {
return 1314;
        }

        [NotThrowException]
        [LogException]
publicint TestMethodWithException()
        {
thrownew System.NotImplementedException();
        }
    }
}
Step Four: Create a VSIX Project
Add the Wizard and Template Content project into the VSIX Project.
Note: the Product name and author should not be too long, or when we install the extensibility a System.IO.PathTooLongException exception will occur.
Build the VSIX project, and now you have your own Solution Template.


