- BoostSolutions
-
Products
-
- Microsoft Teams
- HumanLike Alert Reminder
- View All Apps
- Pricing
- Support
- Company
This tutorial will introduce main features about AD Administration, if you want to learn more details, please Click here for the user guide of the AD Administration.
You can add the AD Administration Web Part to any SharePoint site in your site collection. To do so, go to the page where you want to add the web part. Click Sittings and then click Edit Page. On the ribbon, click Insert under Editing Tools, and then click Web Part.
In the Categories section, click BoostSolutions Web Parts, select BoostSolutions AD Administration Web Part, and then click Add. Then the AD Administration web part will be added on the page.

If the Web Part was not configured in Central Administration, then it will be displayed as below:

Note: The web part will only be displayed to users with the right permissions.
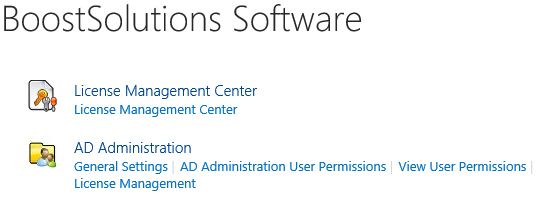
On the Central Administration homepage, click BoostSolutions Software Management. Under AD Administration, you will find four links listed as below:
2.1 Configure AD Administration General Settings
The General Settings of AD Administration give you the option to specify the configuration of logs and SMTP Server settings.
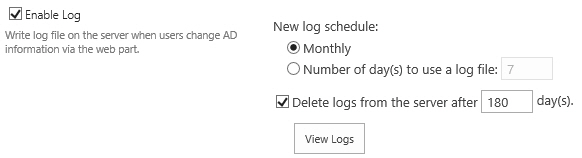
The Enable Log section allows you to set the log options:
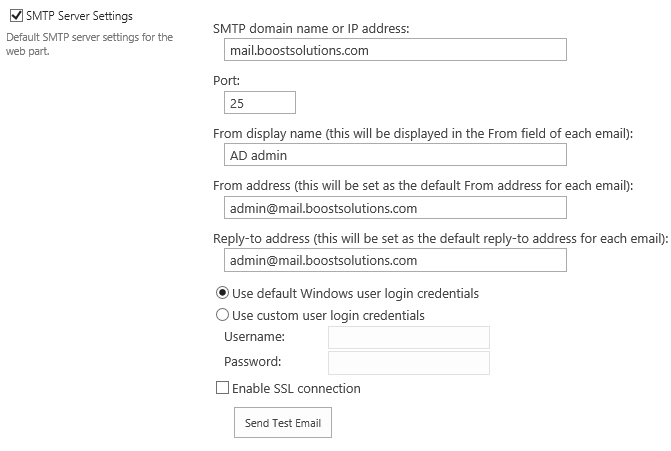
The SMTP Server Settings section allows you to customize the SMTP settings for the AD Administration Web Part. There is no need to customize these settings if the SMTP server settings are already configured in SharePoint Central Administration. Therefore, you just need to change these settings if you want some customized settings for outgoing emails.
2.2 Manage AD Administration User Permissions
a. Initially, there are no items showing in the view, as no user has been added. Click Add Users to create a role for a user or a group.
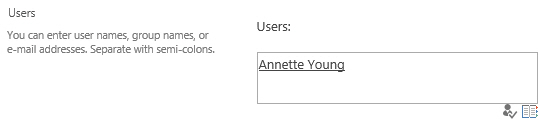
b. In the Users section, specify the users/groups for whom you want to create this role. Type their names or their email addresses. Then click the people picker to verify names.
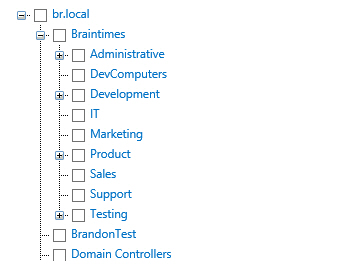
c. In the Organizational Units section, specify which organizational units (OUs) the users/groups can manage using the AD Administration Web Part. To do this, you need to specify the domain name and the administrator's credentials.
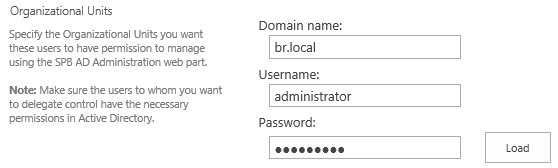
Click Load to load the OU tree based on these login credentials.In the OU tree, select the OUs that the users/groups can manage.
d. In the Permissions section, specify which permissions you want to delegate to the users/groups. Select the check boxes according to your needs. The permissions includes:
e. You can also manage the tabs and properties for the users, see 2.3 Configure Web Part Layout and AD Properties Settings for details.
f. Click Save to have the user added to AD Administration.
2.3 Configure Web Part Layout and AD Properties Settings
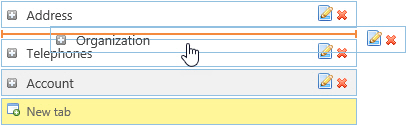
On initial setup, AD Administration provides four tabs (Cerneral, Address, Telephones and Organization), including the default AD properties. For each user or group set up to use AD Administration, this design can look different.
To create a tab, click New tab. Type a name for the new tab, and press the Enter key or click
elsewhere of the tab to confirm. To change the current display name of a tab, click the edit
 icon, and then type a new
name in the text box. To delete a tab, click the delete
icon, and then type a new
name in the text box. To delete a tab, click the delete
 icon. You can also drag and
drop a tab to adjust the positions of tabs.
icon. You can also drag and
drop a tab to adjust the positions of tabs.
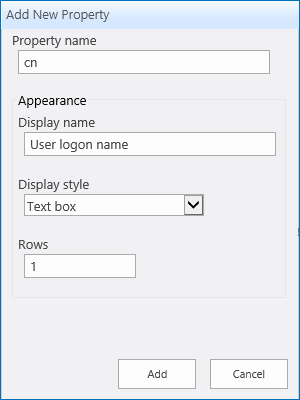
a. To add a new AD property, expand the tab where you want to add the property, click Add New Property. In the open window, type a name and display name for the property.
b. Set the the display style for this property. The Display Style allows you to specify how users can enter their AD property information, typing texts in the text box, or selecting values from the drop-down list or lookup column. Click Add.
c. To edit a property, click the edit icon. In the open window, change the display name or display style, and then click Save.
d. To delete a property, click the delete icon on the right side of the property. A message appears asking if you are confirmed with the deletion. Click OK if you are confirmed.
You can drag and drop the properties to adjust the positions of properties within a tab.
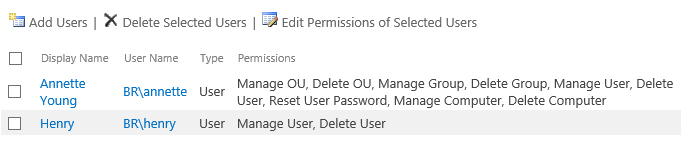
You can view permissions that you assigned for users. Click View User Permissions. Then you will be directed to the View User Permissions page. All users in a group will be displayed. Users will be displayed with Display name, User name, Type, Permissions inherited from, and the Permissions themselves.
According to the configurations for ADA Web Part users in Central Administration (CA), the Web Part will display the OUs, tabs and properties as configured.
For Christian, three OUs were selected for him in CA. When he logs on to the site where the Web Part is added, the Web Part will display those three OUs. The display order of tabs is adjusted as configured (The Organization tab is right after the General tab). The user properties are also displayed as preciously configured. He can manage AD with the OUs, groups and users via the Web Part according to the permissions set up for him in CA.
AD Administration offers 3 different views (Organization, Alphabetical and Sites) to display the structure and the users in it.
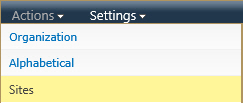
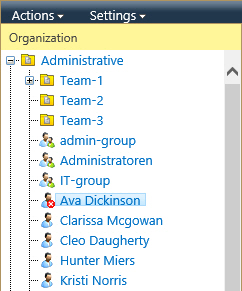
The Organization view is the default view for ADA Web Part. In this view, information is displayed according to the OU structure in Active Directory. You can see the OUs as well as the groups and users.
The Alphabetical view displays all users alphabetically by the first letter of their last names. The number in brackets after the letter indicates the number of users whose last name begins with the letter.
If a SharePoint environment contains many users, the Alphabetical view will display users summarized in object sets. This can be configured in the Appearance Settings of the Web Part, see 3.2.3 Appearance Settings for details.
Note: This functionality is not fully supportable for Asian languages.
The Sites view displays the users and groups according to their permissions to the sites in the SharePoint environment.
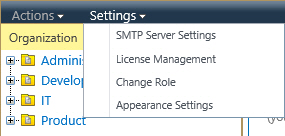
The ADA Web Part Settings Menu allows users to change the settings include: SMTP Sever Settings, License Management, Change Role and Appearance Settings
Note: The user must have Customize Pages permission to the site. Otherwise, the Setting menu is not available. If the user only has one role, the Change Role (see 3.2.2 Change Role for details.) setting is not available.
Here users can customize SMTP server settings that are different from those configured for AD Administration Settings in Central Administration.
The configuration here is the same as that for AD Administration General Settings in Central Administration.
If a user has different permissions to two or more OUs, the user can specify which role he/she wants to use. Multiple roles are available because this user might be part of one or several groups for which permissions to ADA Web Part are delegated.
The user has to specify which role to use, and he/she can always change the selection via Change Role.
The Appearance Settings allows users to specify how many users should be displayed in one set of objects in the Alphabetical view. This makes the view ease to manage and reduces the loading time to pull information from AD into the Web Part; and this is especially useful if you need to manage a large number of users with their last names beginning with the same letter.
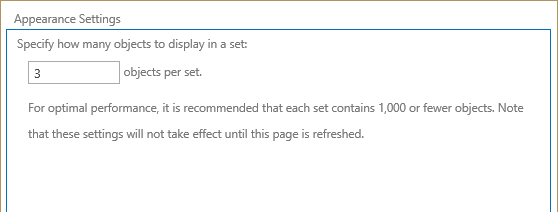
Note: For optimal performance, it is recommended that each set contains no more than 1,000 objects.
The Actions menu contains several commands that help you manage OUs, groups and users, and send emails.
According to the permissions assign to users, they can manage AD with its OUs, groups and users, and even send emails directly in ADA Web Part.
Select the OU in which you want to create an OU and click Create OU on the Actions menu. Or, right-click on the OU, and then click Create OU.
Enter relevant OU information on the right side of the Web Part. Click Save.
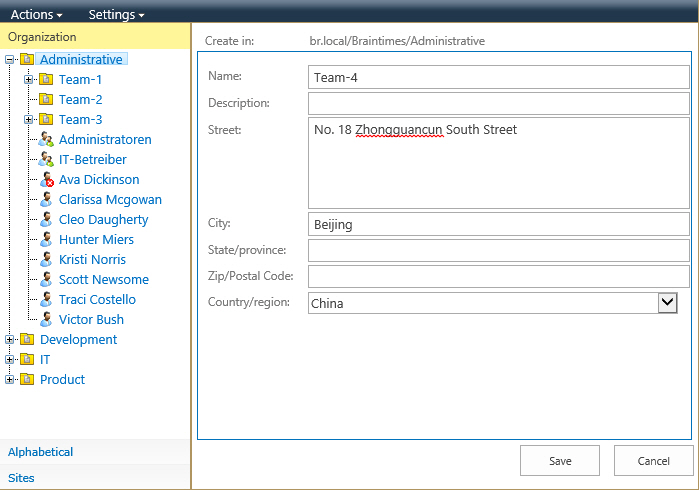
A message will ask you if you are confirmed to save OU information to AD. Click OK.
Select the OU you want to delete and click Delete on Actions menu. Or, right-click on the OU and click Delete.
A message will ask you if you are confirmed with this deletion. Click OK.
Select the OU you want to rename and click Rename on the Actions menu. Or, right-click on the OU, and then click Rename.
Type a new name for the OU and click elsewhere of the editing field.
Select the OU you want to refresh and click Refresh o the Actions menu. Or, right-click on the OU, and then click Refresh.
This will refresh the OU, and expand it if it was collapsed before.
4.1.5 Edit the AD properties of an OU
AD Administration offers 3 ways to display and change the AD properties of OUs:
Select the OU for which you want to edit the properties and click Properties on the Actions menu.
Right-click on the OU, and then click Properties.
Click on the OU, and then edit its properties on the right.
Click Save. A message will ask you if you are confirmed to save OU information to AD. Click OK.
Select the OU in which you want to create a group and then click Create Group on the Actions menu. Or, right-click on the OU, and then click Create Group.
Type the group information on the right side of the Web Part.
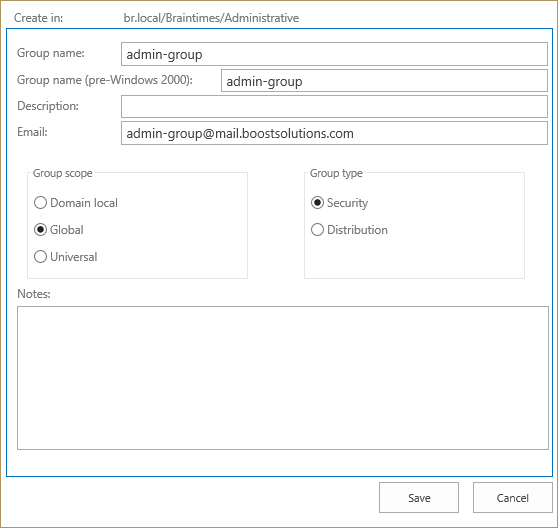
After the group name is entered, the pre-Windows 2000 group name will be added automatically. This ensures compatibility with pre-Windows 2000 system environment.
After all information is entered, click Save. A message will ask you if you are confirmed to save the group information to AD. Click OK.
Select the group you want to delete and click Delete on the Actions menu. Or, right-click on the group, and then click Delete.
A message will ask if you are sure to remove this group. Click OK and then this group will be removed.
Select the group that you want to rename and click Rename on the Actions menu. Or, right-click on the group, and then click Rename.
Type a new name or change the name for the group, and then click elsewhere of the editing filed.
4.2.4 Edit the AD properties of a Group
AD Administration offers 3 ways to display and change the AD properties of groups:
Select the group for which you want to edit the properties and click Properties on the Actions menu.
Right-click on the group, and then click Properties.
Click on a group, and then edit its properties under the Group tab.
Under the Group tab, the name of the group can be changed. The Group scope and Group type are displayed. Depending on the current environment,some values under the group scope and type might not be available. Meanwhile, you can add members to this group or remove members from this group under the Members tab, see 4.2.5 Add Users to or Remove Users from a Group for details.
Click Save to save the changes.
4.2.5 Add Users to or Remove Users from a Group
Click the Members tab to display all current members of this group.
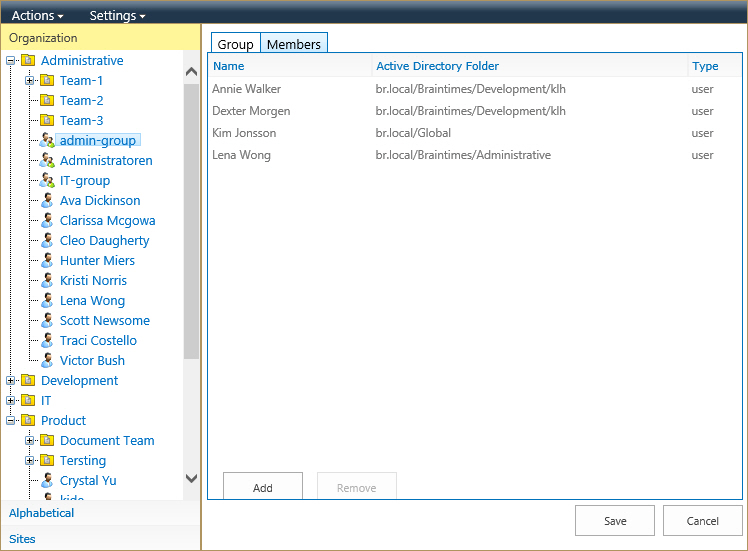
Here you can add users to or delete users from this group.
To add a user to the group:
Under the Members tab of a group, click Add. Type the name of the users/groups that you want to add, and click the people picker to verify names or look up the users/groups from the directory. Click OK. Click Save and then the user is added a member of the group
To delete a user from the group:
Select the user and then click Remove. A message will ask if you are confirmed to remove the user from this group. Click OK and then it will be removed.
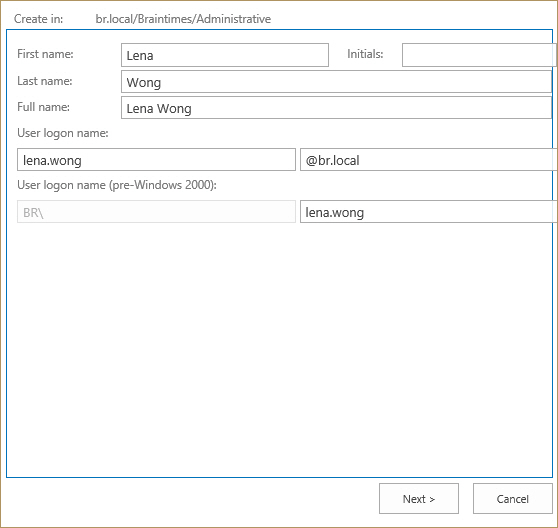
Select the OU in which you want to create a user and click Create User on the Actions menu. Or, right-click on the OU, and then click Create User.
On the right side of the Web Part, enter the user information, and then click Next.
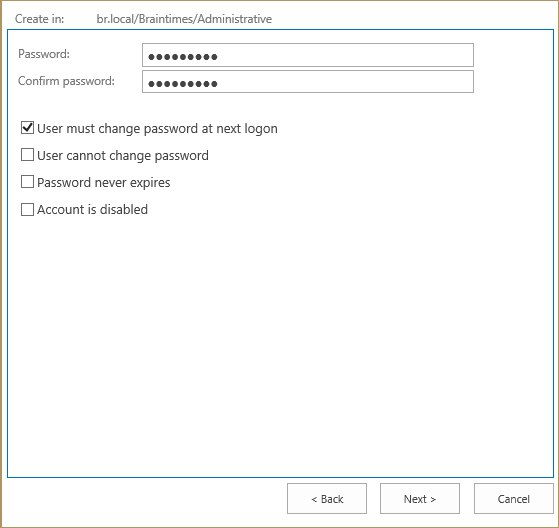
Set the password for this user and then click Next.
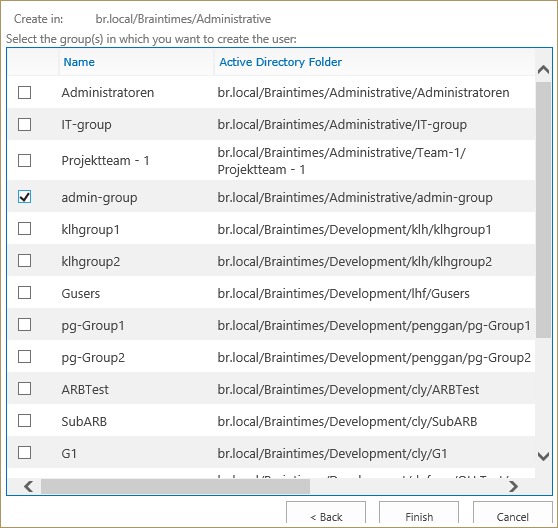
Select the group to which you want to add this user. This is optional. Click Finish.
At this stage, this user has only been added to AD, he/she has not yet been added to SharePoint. If you only want to create this user in AD, click Finish.
Select the user for whom you want to change group and click Change Group on the Actions menu. Or, right-click on the user and then click Change Group.
Clear the check box before a group name to remove this user from the group. Then add this user to another group(s) by clicking relevant check box(es). Click OK to confirm.
Select a user for which you want to disable the account and click Disable Account on the Actions menu. Or, right-click on the user, and then click Disable Account.
A message will ask if you are confirmed to disable this user account. Click OK. The account of the user is now disabled
The procedure is similar if you want to enable a user. The Disable Account command will change to Enable Account.
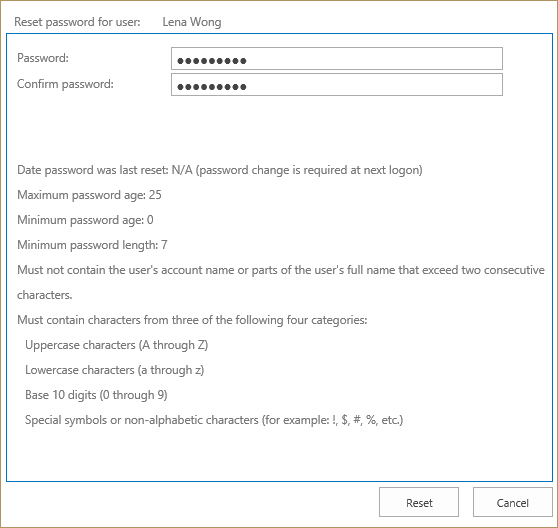
Select the user for whom you want to reset the password and then click Reset Password on the Actions menu. Or, right-click on the user and click Reset Password.
On the right side of the Web Part, reset the user password following the password policy. Then click Reset.
4.3.5 Edit the AD Properties of an User
AD Administration offers 3 ways to display and change the AD properties of a user:
Select the user for which you want to edit its properties and then click Properties on the Actions menu.
Right-click on the user, and then click Properties.
Click on the user, and then edit its propertie.
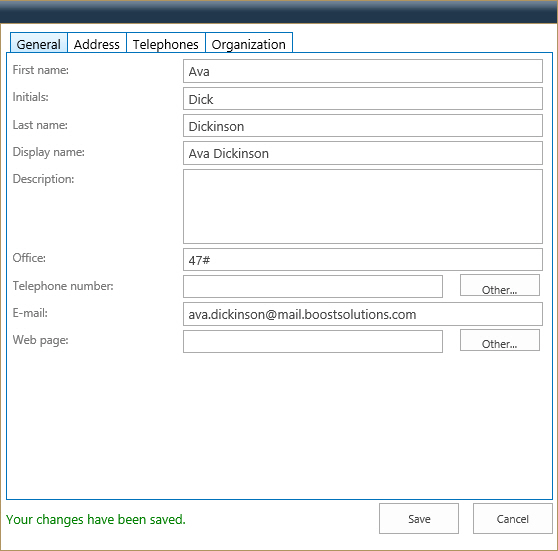
On the right side of the Web Part, change the AD properties of the user and then click Save.
A message will ask if you are confirmed to save user information to AD. Click OK.
Select the user you want to delete and then click Delete on the Actions menu. Or, right-click on the user, and then click Delete.
A message will ask if you are confirmed with the deletion. Click OK. Then the user will be removed.
Select the user you want to rename and then click Rename on the Actions menu. Or, right-click on the user, and then click Rename.
The user name now becomes editable. Type a new name or change the name for the user, and then click elsewhere of the editing field.
AD Administration enables you to manage computers in SharePoint, you can do these operation: edit properties, change group, enable/disable or delete computer.
4.4.1 Edit the AD Properties of a Computer
Select the computer for which you want to edit its properties and then click Properties on the Actions menu. Or right-click on the computer and click Properties. Or just click on the computer.
On the right side of the Web Part, change the AD properties of the computer and then click Save. (As with Active Directory, you can only edit the editable property of AD, such as Description property.)
A message will ask if you are confirmed to save computer information to AD. Click OK.
4.4.2 Change Group for a Computer
Select the computer that you want to change group and click Change Group on the Actions menu. Or Right-click on the computer and then click Change Group.
Clear the check box before a group name to remove this computer from the group. Then add this computer to another group(s) by clicking relevant check box(es). Click OK to confirm.
4.4.3 Disable/Enable a Computer
Select a computer that you want to disable and click Disable Account on the Actions menu. Or right-click the computer and then click Disable Account.
A message will ask if you are confirmed to disable this computer account. Click OK. Then the
computer account is disabled. The computer icon  will turn to
 .
.
The procedure is similar if you want to enable a computer. The Disable Account command will
change to Enable Account. After the computer account is enabled, the computer icon
will turn back to.
Select the computer you want to delete and then click Delete on the Actions menu. Or right-click on the computer and then click Delete.
A message will ask if you are confirmed with the deletion. Click OK. Then the computer will be removed.
