- BoostSolutions
-
Products
-
- Microsoft Teams
- HumanLike Alert Reminder
- View All Apps
- Pricing
- Support
- Company
BoostSolutions Calendar Rollup can aggregate calendar events from SharePoint, Exchange, Google Calendar and external content type. Calendar Rollup allows user to view, track and manage all events in one place.
For more details about Calendar Rollup, please check the Calendar Rollup User Guide .
1. Add Calendar Rollup Web Part
Before you use the Calendar Rollup Web Part to collect calendar events, the Web Part needs to be added to the page first.
a. Enter a page or site which you want to add the Calendar Rollup Web Part to. On the Site Actions menu, click Edit Page.
b. Click on the page where you want to add the Web Part, click the Insert tab, and then click Web Part.
c. Under Categories, select BoostSolutions Web Parts; then select BoostSolutions Calendar Rollup Web Part; lastly click Add.
d. When you finish editing the page, click the page tab, and then click Save & Close.
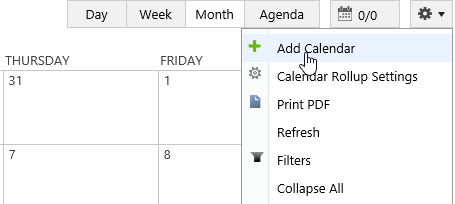
a. On top right of SharePoint Calendar Rollup Web Part, there's an integrated dropdown menu, select Add Calendar
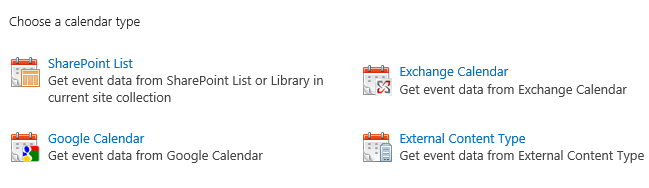
b. Choose which calendar source (such as SharePoint List, Exchange Calendar, Google Calendar and External Content Type) you would like to import to SharePoint Calendar Rollup web part.
2.1. Data Source Configuration
There are four different sources, namely, SharePoint List or Library, Exchange Calendar, Google Calendar and External Content Type and each has its own settings.
SharePoint List or Library
a. In the Add Calendar page, select the SharePoint List option.
b. In the Add or Change a Calendar page, specify the Data source configuration settings.
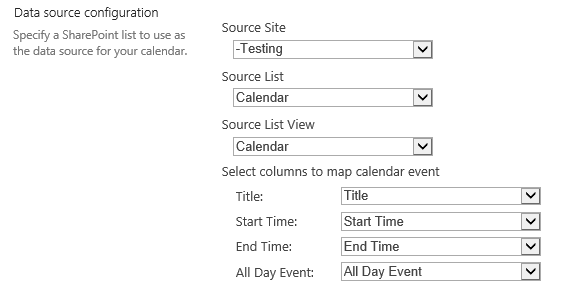
Source Site: Select the site which the list or calendar belongs to.
Source List: Select a SharePoint list or calendar.
Source List View: Select one view; the items in that view will be added on the Web Part.
Select columns to map calendar event: Map the list or calendar columns to the indicated fields.
Exchange Calendar
a. In the Add Calendar page, select the Exchange Calendar option.
b. In the Add or Change a Calendar page, specify the Data source configuration settings.
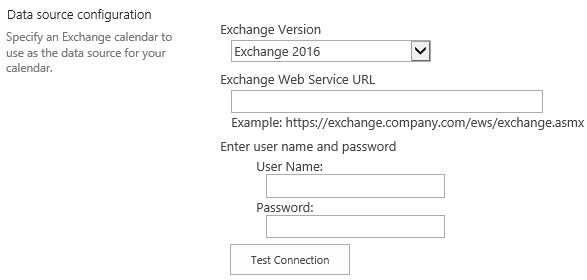
Calendar Rollup can work with the following exchange versions: Exchange 2007 SP1, Exchange 2010, Exchange 2010 SP1, Exchange 2010 SP2, and Exchange 2013.
a. In the Exchange Version drop-down list, select one version.
b. Enter the URL in the Exchange Web Service URL box.
c. Enter user name and password: Use the specified account information to retrieve calendar events from Exchange.
d. Click the Test Connection button to validate the connection.
Google Calendar
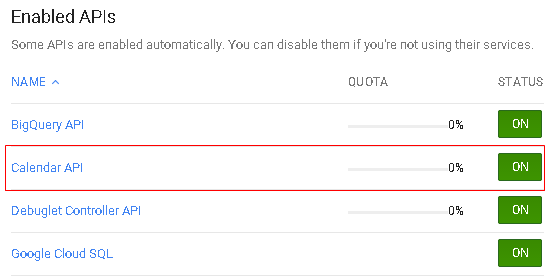
Google now uses OAuth 2.0 for server-to-server interactions, in this scenario you specify a service account in Calendar Rollup to call Google API. Once you configure a service account and setup the connection, Calendar Rollup will retrieve calendar data from google on behalf of the service account.
To create a service account, please refer to https://developers.google.com/accounts/docs/OAuth2ServiceAccount.
Before configuration, there are some tips you should to know:
Follow these steps to setup a connection to Google Calendar:
a. In the Add Calendar page, select the Google Calendar option.
b. In the Add or Change a Calendar page, specify the Data source configuration settings.
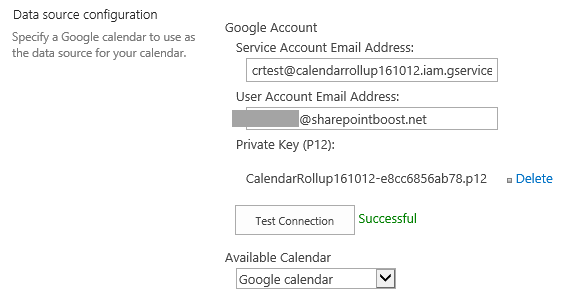
Here you need to specify a service account email address, user account email address and a private key. (A service account and private key is created or generated in Google Developer Console)
a. Service Account Email Address: enter your Google service account email address, which can be found Google Developers Console -> Projects -> APIs&auth -> Credentials.
b. User Account Email Address: enter your google email address.
c. Private Key: a private key is generated in the Google Developer Console -> APIs&auth ->Credentials. Click Generate new P12 key button to generate a private key, and then upload in Calendar Rollup.
d. Test Connection: validate the connection.
e. Available Calendar: once the connection is successful, select a Google calendar.
External content type
a. In Add Calendar page, and select the External Content Type option.
b. In the Add or Change a Calendar page, specify the Data source configuration settings.
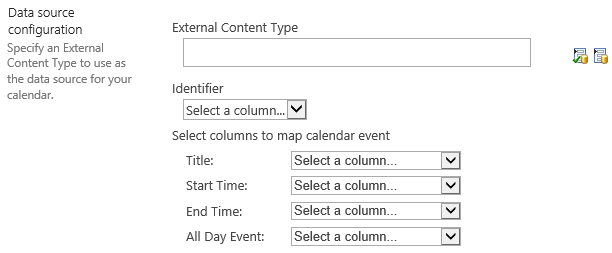
c. Click the  icon to
check if there is an external data configured in site.
icon to
check if there is an external data configured in site.
d. Click the  icon to
open an External Content Type Picker dialog, and select one external content type.
icon to
open an External Content Type Picker dialog, and select one external content type.
e. Specify a column as identifier.
f. Map the external data columns to the indicated fields.
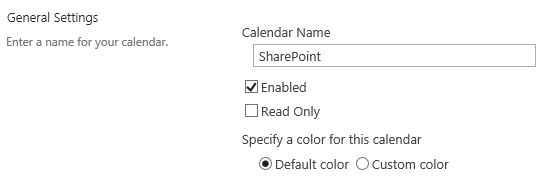
Calendar Name: Specify a name for the incoming calendar. This name will be shown on the calendar rollup Web Part.
Enabled - displays the data on SharePoint Calendar Web Part.
Read Only - forbids SharePoint users to edit data.
Specify a color for this calendar: Specify a color to represent the calendar resource. If you add multiple calendars, setting different colors will help you quickly and easily to identify events.
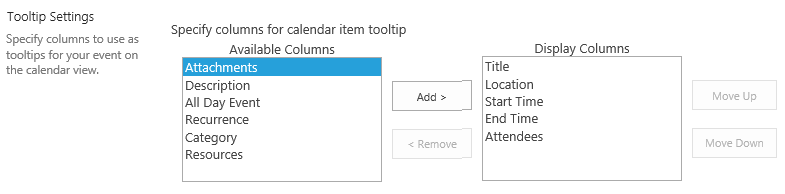
Choose the columns to be displayed on calendar when an item is clicked, Meanwhile, these columns will also display in agenda view.
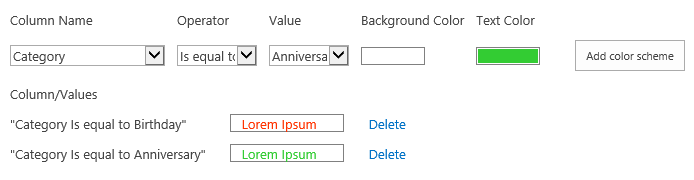
You can easily setup an event's color by event type, calendars always have a column like Category or Priority, choose a value of that column and setup a color scheme, then click Add color scheme, and when these events are loaded in day, week or month view, color scheme will be automatically applied.
This function allows you to specify whether additional information (Location and Organizer) appears on the event bar; this feature is only available for Exchange Calendar.

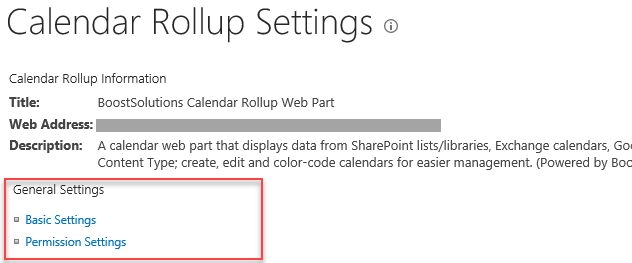
3. Calendar Rollup General Settings
On this page, you will see information about your Calendar Rollup Web Part, General Settings and calendars that are included in the rollup. You may also add a new calendar by clicking the link on the lower left of the list.
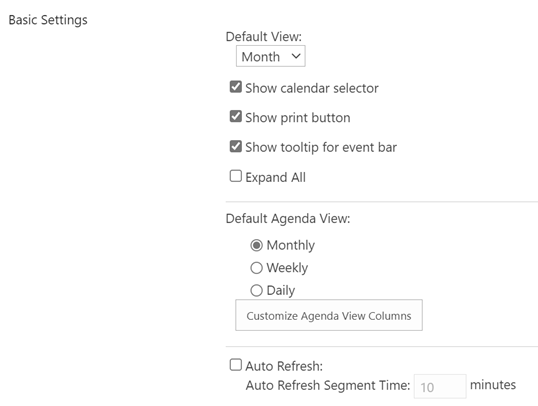
Default View set to show the default view on your Calendar Rollup web part, by month, week or day.
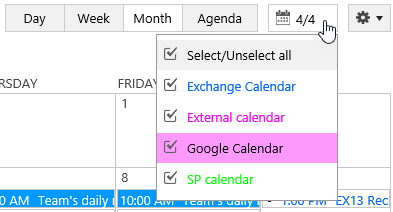
Show calendar selector allows users to view and choose what calendars would be displayed.
Show print button activate this if you wish to show the print menu in the integrated menu on the Calendar Rollup web part.
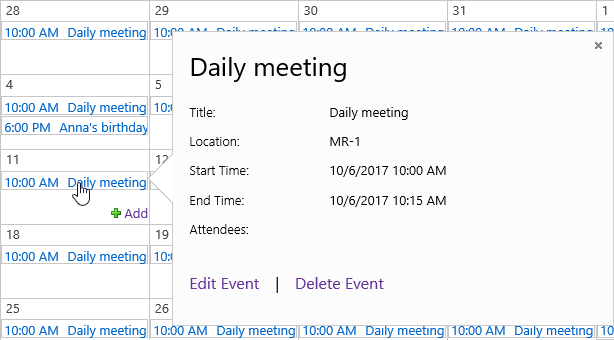
Show tooltip for event bar when activated, after move your mouse over an event, it shows a summarized detail of the event.
Auto Refresh - when activated this, web part will auto renew updated data at every interval time.
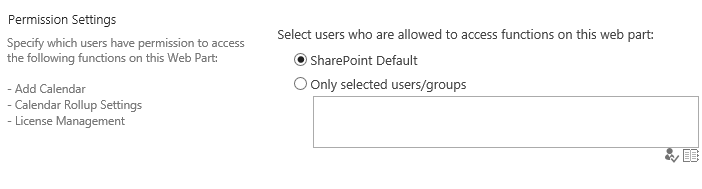
You could set other users to edit your calendar. Selecting SharePoint Default check box will maintain the same permission settings with SharePoint, while another check box allows you to set particular users or groups to edit your calendar.
4. Navigate your Calendar
There are several options and features in your Rollup Calendar front page.
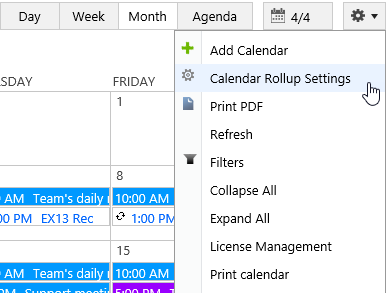
There are an integrated dropdown menu and several buttons on the top right corner of the web part.
Expand/Collapse All ' shows or hides all the events in the calendar.
You may also click the text below the list to expand or collapse a specific date.
Toggle between Day, Week, Month view, Agenda view.
Calendars selector a way to switch how many calendars will be available
Print print the calendar
Refresh refresh the page to update calendar
Note: The last three menus can be shown or hide in your web part, you can find this option setting in Basic Settings.
c. We make it easier for users to drag and drop calendar events as well as drag the event to change the time. Also, drag to cover the days without creating another event.
Note: To move an event to different dates will only work with Day, Week and Month view.
The two square white tabs indicate that the event is available for dragging.
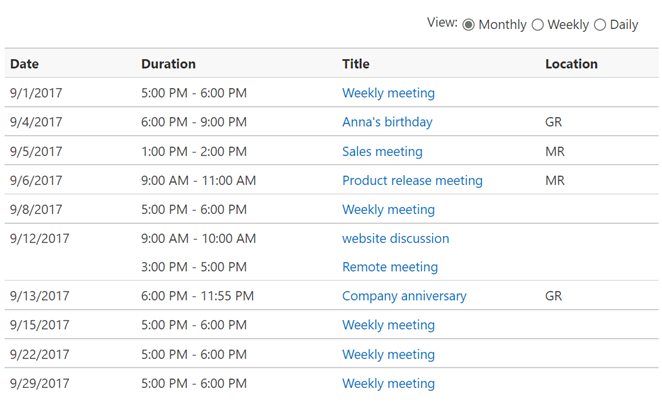
Agenda view can chronologically lists events from all calendars, It provides an easy way to check and understand events.
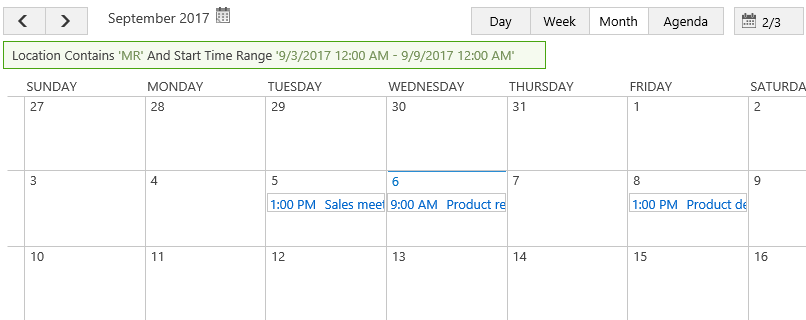
A filter option is provided to find exact events, to setup or add a new filter setting, click on the dropdown menu, and select Filters.
Add a filter - In the pop-up window, choose a column you want to filter events, give some conditions, then click 'Add' button.
When a filter setting is saved in your browser, you can continue adding another or click on Apply button to make it works.
Delete a filter - In the pop up window, click on button ' X ' to delete a filter.
See filter results- when filter setting window is closed, filter settings will automatically work in current calendar view.
Notes: Filter settings will keep working until you close web browser window.
Calendar rollup allows users to save current view into a *.PDF file in minutes, click on Export to PDF and choose a file location to save.