- BoostSolutions
-
Products
-
- Microsoft Teams
- HumanLike Alert Reminder
- View All Apps
- Pricing
- Support
- Company
Permission Manager provides a centralized platform to manage permissions. Administrators can search, analyze, backup and manage SharePoint users or group permission as well as clone, add, modify and remove user permissions on different levels, including sites, lists, folders and even web applications. Administrators can also search user permissions and export them as an excel file for further analysis.
This product has to be installed and deployed before it can be used. For further reference, please see our Product Installation Guide.
2.1. Enter SharePoint Permission Manager
Open a browser and enter: http ://< machine>: 8787. If the default port number has been changed from 8787, enter the new port number.
Using SharePoint permission management tool, you can copy permissions between users or groups for any selected web applications, sites, lists or folders.
If a new user joins a company, it can take a lot of time and effort to assign permissions on different sites or lists for this user. Using Permission Manager you can copy permissions from another user in the same or similar position to a new user across the entire farm.
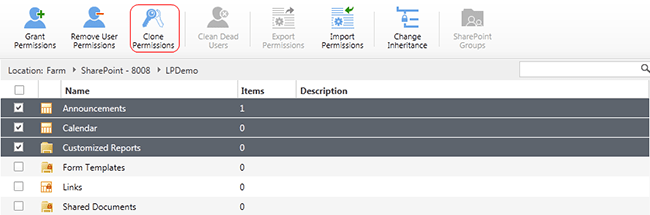
a. In the Navigation Pane click Permission Management then click a site.
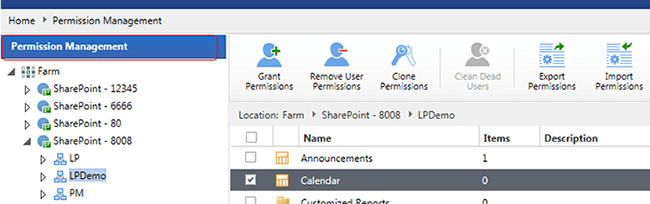
b. Select lists.
c. On the toolbar click Clone Permissions.
d. In the Clone Permissions window specify the properties.
In the Clone permission from box enter a user or group name.
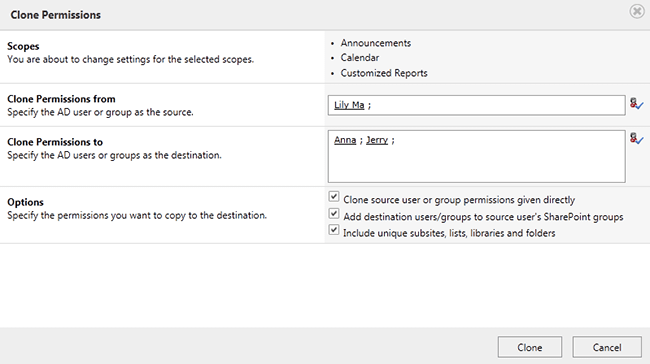
In the Clone permission to box enter one or more user(s) or group(s) names.
Select the permission operations by checking the appropriate check-boxes.
Clone source user or group permissions given directly: Will only copy the given permissions to the target users or groups.
Add destination users/groups to source user's SharePoint groups: Will add the target users to SharePoint groups which the original user belongs to.
Include unique sub sites, lists and folders: Specify if you want to assign permissions to these contents.
e. Click Clone and the permissions will be copied immediately.
a. In the Navigation Pane click Permission Management and then click a site.
b. Select lists and libraries.
c. On the toolbar click Grant Permissions.
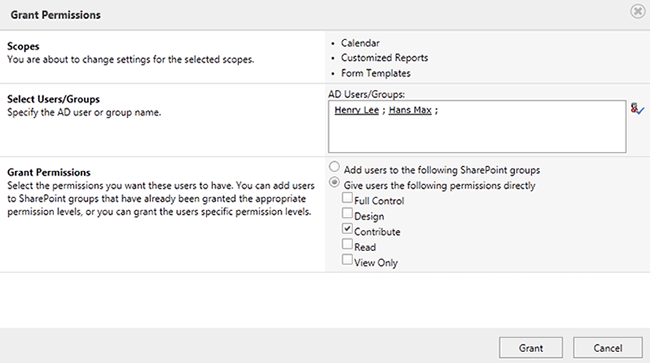
d. In the Grant Permissions window specify the properties.
In the Select Users/Groups box enter the user(s) or group(s) names.
In the Grant Permissions section grant permissions to user(s) or group(s).
Add users to the following to SharePoint groups: Will add the domain users or groups to the SharePoint groups.
Give users the following permission directly: Assign permissions to specified users or groups.
e. Click Grant
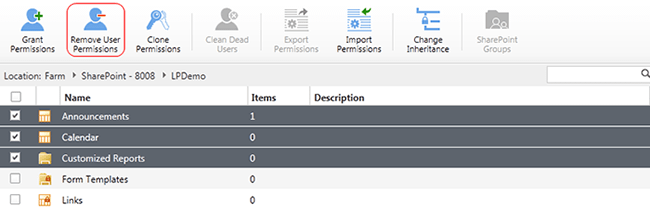
a. In the Navigation Pane click Permission Management and then click a site.
b. Select one or more lists or libraries.
c. On the toolbar click Remove User Permissions.
d. In Remove User Permissions window specify the properties.
In Select Users/Groups section box enter user(s) or group name(s).
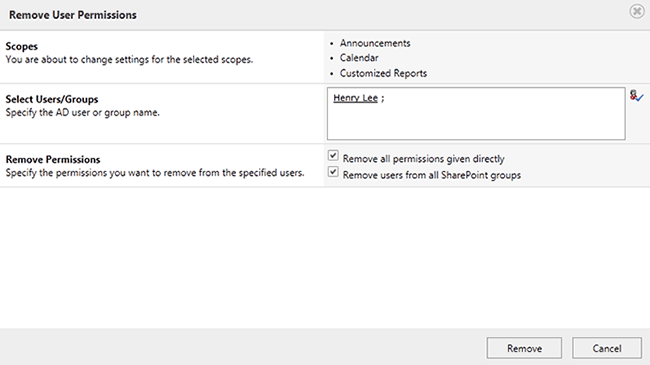
In the Remove Permissions section, remove user(s) or group permission(s).
Remove all permission given directly: Remove permissions from the specified user(s) or group(s).
Remove users from all SharePoint groups: Remove users or groups from all SharePoint groups.
e. Click Remove.
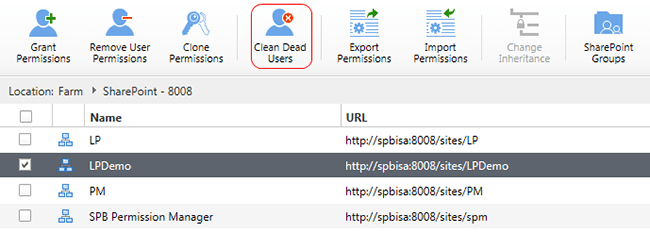
This feature will detect and reveal users that still have permissions within SharePoint even though they have been disabled or deleted from the active directory. You can then remove them from the site collection.
a. In the Navigation Pane click Permission Management and then select a web application.
b. Select a site collection.
c. On the toolbar click Clean Dead Users.
d. Select the type of dead user(s).
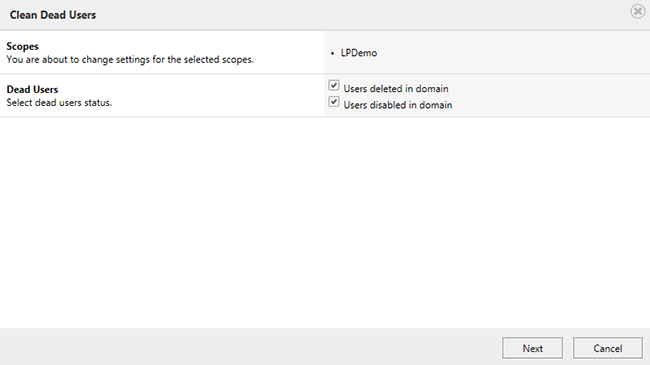
Users deleted in domain: Users exist on SharePoint, but have been deleted in the active directory.
Users disabled in domain: Users exist on SharePoint, but have been disabled in the active directory.
e. Click Next
f. All the disabled users or deleted users will be shown in a table.
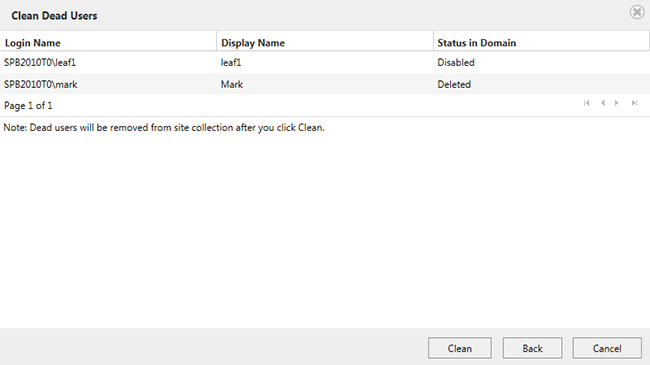
g. Click Clean to remove the users from the site collection.
Export Permissions enables you to export the objects permission settings as an xml file for backup or as a template.
a. In the Navigation Pane click Permission Management and then select a site.
b. Select a list.
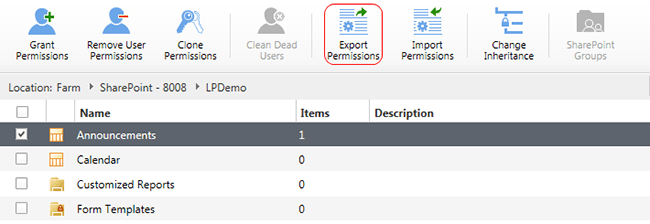
c. On the toolbar click Export Permissions to save an xml file to your local computer.

a. In the Navigation Pane click Permission Management and then select a site.
b. Select lists and libraries.
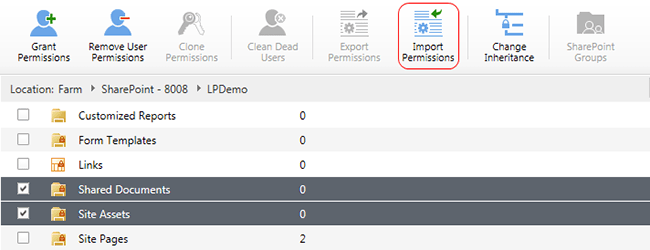
c. On the toolbar click Import Permissions.
d. In the Import Permission window click Browseto upload an xml file.
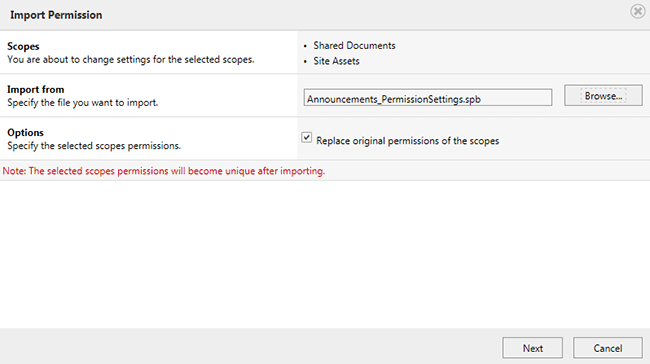
e. Select the permission operation by checking the appropriate check-boxes.
Replace original permissions of the scopes: Will replace all permission settings of the selected sites, lists or folders.
a. Click Next to display the permission settings contained in the xml file.
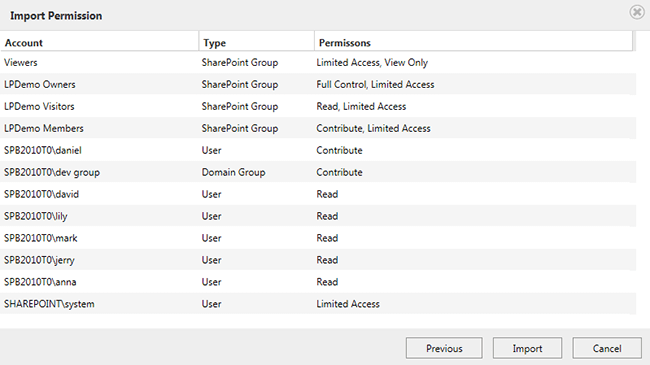
b. Click Import.
a. In the Navigation Pane click Permission Search and then select a site.
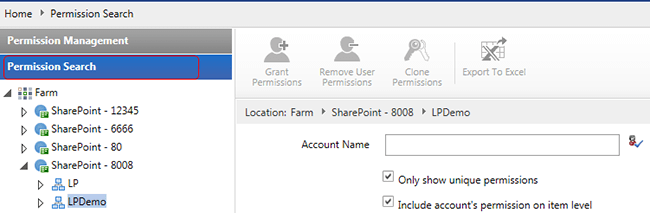
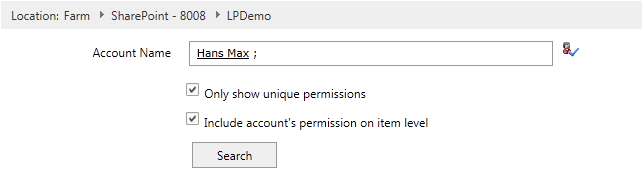
b. In the Account Name box enter a user or group name.
c. Select more rules.
Only show unique permissions: Will only search the account's permission on objects whose permissions are broken.
Include account's permission on item level: Specify if the item will be shown in the search results.
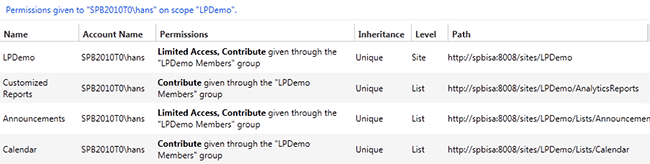
d. Click Search to show the search results.
5.1. Create a SharePoint Group
Create Group enables you to create a new SharePoint group in site.
a. In the Navigation Pane click User and Group Management and then select a site.
b. Click the SharePoint Groups node.
c. On the toolbar, click Create Group .
d. In the Create Group window, specify the properties.
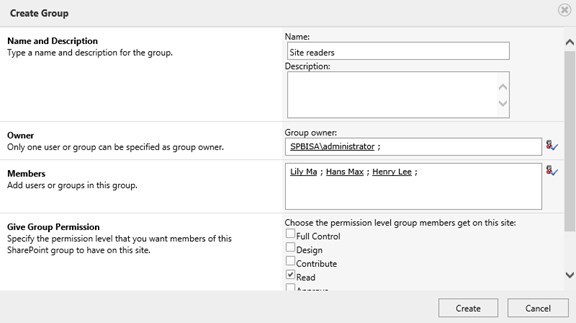
In the Name and Descriptions section, type the group name and description.
In the Owner section, specify a user or SharePoint group as the owner.
In the Members section, enter the user or group name(s).
In the Give Group Permission section, select the permission level that you want the members to have.
e.Click Create, the group will be created.
5.2. Copy/Move Users between SharePoint Groups
This function allows you to copy or move users from one SharePoint group to another.
a. Enter a SharePoint group page and select the users or groups you want to copy or move to another group.
b. Click the Copy Users to  or the Move Users to
  button on the toolbar.
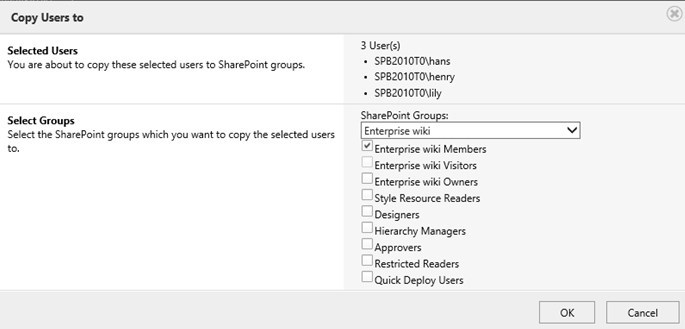
In the Select Groups section, select one site from the drop-down list and select SharePoint groups.
a. Click OK. The users will be added to the target SharePoint groups.
6.1. Export All SharePoint Users
This feature allows you to export all SharePoint users to an excel file for further analysis and auditing.
a. Select the All Users node under one site collection.
b. On the toolbar, click Export All Users . 
c. Click Save to download the excel file to your computer.

d. All SharePoint users information will be saved in the excel file.
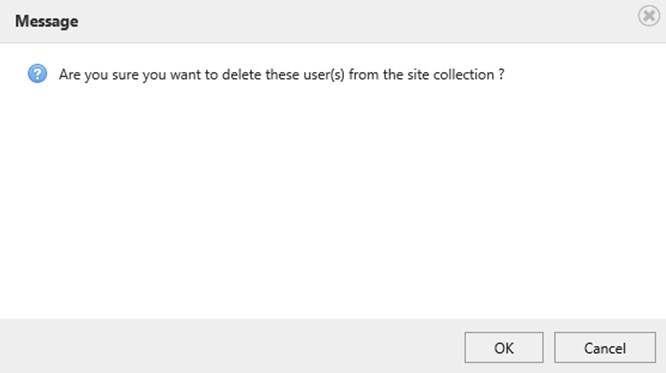
This feature enables you to delete specified users from the site collection.
a. Enter the All Users page and select the users which you want to delete from SharePoint.
b. On the toolbar, click Delete Users .
c. In the Confirm window, click OK. Users will be successfully removed.
6.3. Check User's Nested Groups
This feature enables you check which groups the specified user belongs, include SharePoint group and domain group.
a. Enter the All Users page and select one user.
b. On the toolbar, click Check Membership
c. In the dialog, the user's nested groups will be shown as follows:

SharePoint Groups: show all the SharePoint groups that the user has been added to.
Domain Groups: Show all the domain groups that the user belongs to.
7.1. View Domain Group Members
This feature allows administrator to check the members of one domain group without entering the active directory server.
a. Navigate to User and Group Management.
b. On the farm tree, select root site of one site collection, and click Domain Groups node.
c. Select the domain groups which you want view the members.
d. Click View Group Members button on the toolbar, and a dialog will appear as followings.
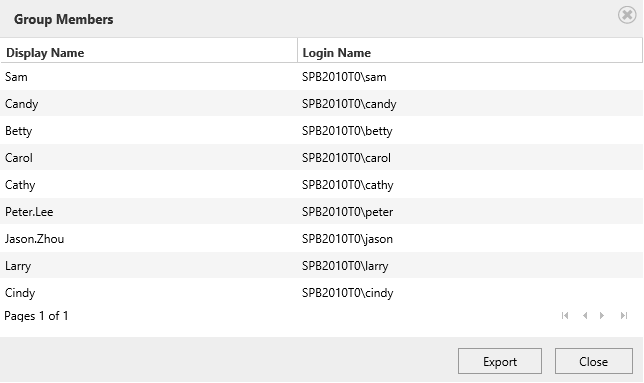
e. Click Export, you can save the members to an excel file.
This feature enables administrator to export all domain groups (added in SharePoint) and members to an excel file.
a. Navigate to User and Group Management.
b. On the farm tree, select root site of one site collection, and click Domain Groups node.
c. Click Export All Groups button on the toolbar, and following dialog will appear.

